|
Quick Navigation
View Product Index
View Category Index
Popular Resources
Free Poker Table Plans
Learn About Poker Chips
Las Vegas Casino Chips
Custom Tokens Drink
Chips
Poker Resources
Why Cheap Poker Chips Suck
|  |
Build
a Poker Table - Let's get Started
First, choose which side of your plywood you prefer to be the top.
If your plywood is slightly bowing, place the direction of the bow up,
and let gravity and our underneath framing take the bow out. I suggest
this because when wood sits in a warehouse for a long time, even strong
wood tends to sag a bit or conform to whatever structure it is sitting
on. You can go a long way toward avoiding this situation by carefully
choosing the smoothest and flattest piece of birch or oak plywood you
can find in the store. If you are going with pine or pressboard, some
level of warping will just be a fact of life.
Take your plywood and place it squarely on your workbench or on the
floor bottom-up. Put your Lifetime table bottom up right on top of the
plywood. You’ll need to have the table exactly in the middle,
so for the 8’ table plans measure 12" on each end and 6"
on each side to center the table. If you are building a 7' table, the
measurements will be 6" and 6", respectively. Take your pencil
and outline around the table to make a visual picture of where this
table will be on the underside (see Figure 3). Then, if you need to
move the table around, you don't have to re-measure and realign everything.
|
|
| Figure 3: Note I use a Lifetime table as a workbench
instead of working off the floor. Don’t let this throw you off.
The board and the top table are all you should focus on here. What you
see here is the Lifetime table you’ll be working with, sitting on
top of the bottom of the poker tabletop, sitting on top of my workbench
(which also happens to be a Lifetime table). |
|
As mentioned previously, you now need to decide what shape
you want the ends your table to have - a continuous arc on each end,
or just rounded off corners. For either design, you’ll need to
be able to draw one or more arcs on the end of the plywood. The technique
I use to outline the required cuts is a simple one. I just get some
kite string and tape it onto a pencil (as low as possible). Then, holding
one end of the string on my center point on the table and the pencil
in my other hand, I can draw nice looking radials for corners (See Figure
4.1).
|
|
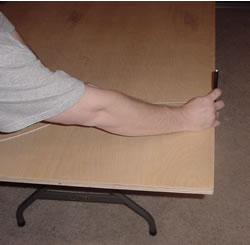
Figure 4.1: Measuring the radius.
|
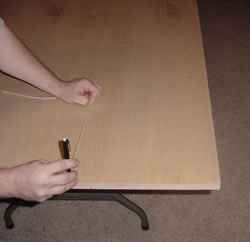
Figure 4.2: Drawing the arc.
|
|
While you have some flexibility, I recommend a ~12"
radius (See Figure 4.3). For this design, you’ll need 12 inches
of string between your center point and the pencil. Keep in mind the
padded railing becomes difficult to install around sharp corners, and
the final product won’t look as nice as when it’s installed
along gentle curves. I’ve found 12” is a nice arc to work
with. Whatever radius you choose to go with, your center point with
be the length and width of your radius from each corner.
|
|
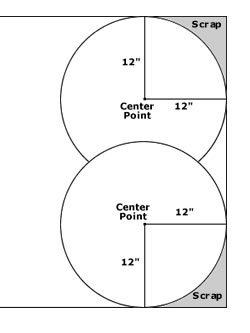
Figure 4.3: Rounded off corners
|
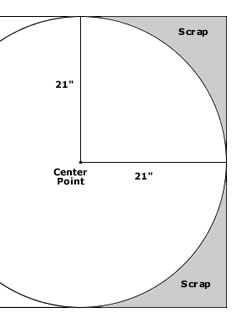
Figure 4.4: Continuous arc
|
|
If you want a completely rounded end, the string measurement
is ~21" (see Figure 4.4). Which design you choose will affect what
needs to be done with the framing underneath slightly. If you opt for
the 12" radial measurement, you won’t be cutting off as much
of the tabletop as with the continuous arc design. Thus, the 12”
radius design will end up with a little more playing area.
<<
Previous page | Next
page >>
|
|
|
| | |