|
Quick Navigation
View Product Index
View Category Index
Popular Resources
Free Poker Table Plans
Learn About Poker Chips
Las Vegas Casino Chips
Custom Tokens Drink
Chips
Poker Resources
Why Cheap Poker Chips Suck
|  |
| Attaching
the padded railing
Attaching the railing is a fairly straightforward process.
I prefer not to make the attachment too permanent in the event that
I want to swap out the felt. I use six attachment points using 1½”
countersunk wood screws. Drill pilot (guide) holes to prevent the screw
from splitting the wood on the railing frame or table. Secure one screw
on each corner and one in the middle of each side. You may want to add
or subtract from this number, but six is a good starting point. Another
thing to consider is marking the tabletop somehow to correspond with
the railing so you know which side is which if you ever need to temporarily
remove the railing. The screws will line up with your previously drilled
holes to help out. That’s it! Here is a picture of the finished
poker table with the padded Naugahyde rail.
|
|
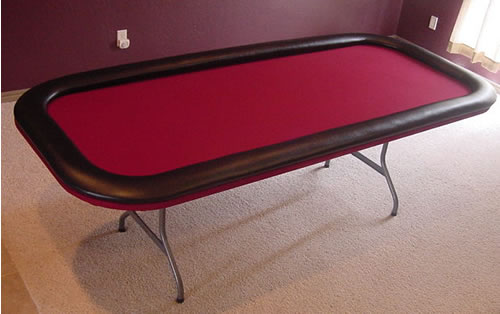
Figure 24: The finished table with
the padded Naugahyde rail. |
|
Notice the red felt that his visible below the Naugahyde
railing. Some people like this and some don’t. If you don’t,
one optional added touch is to add a short black skirting around the
edge of the table, right below the padded railing. This will do a great
job of concealing the colored felt on the vertical edge below the padding,
while at the same time, adding some elegance and refinement to your
finished table. The material can be found in fabric shops in many colors
and textures.
Have fun with your new custom table!
<<
Previous page | Next
page >>
|
|
|
| | |