|
Quick Navigation
View Product Index
View Category Index
Popular Resources
Free Poker Table Plans
Learn About Poker Chips
Las Vegas Casino Chips
Custom Tokens Drink
Chips
Poker Resources
Why Cheap Poker Chips Suck
|  |
| Naugahyde
poker table railing cover
We’re now ready to attach the Naugahyde to the padded
railing. Lay the Naugahyde down on the floor with the finish side down.
Place your padded railing on top of it with the padding side down. Because
the piece of Naugahyde is larger than the railing, you’ll notice
there won’t be a seam. Attach the outside of the entire railing
by folding the outside material over the rail and stapling it to the
frame. Work around the table, stretching it and stapling it tightly
to the frame. Once you’ve gone all the way around, cut off any
excess hanging loose beyond the staples.
|
|
|
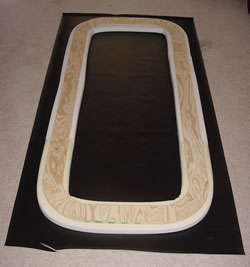
Figure 22.1: Layout to begin stapling Naugahyde
|
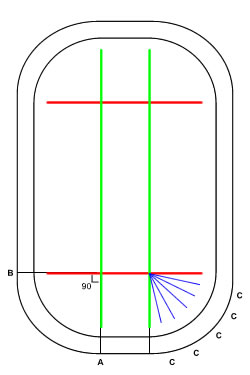
Figure 22.2: Cut diagram
|
|
The next step is a little tricky, as we need to start
securing the Naugahyde to the inside of the railing. You’ll need
to be very patient and methodical. Draw on the Naugahyde, and then make
the cuts to the center portion of the Naugahyde as you see depicted
in Figure 22.1 (making sure to STOP EACH
CUT SHORT AROUND 3” from the inside of the railing)
in the following order:
- Do the green line
cuts first. These need to be aligned with the 90-degree radius point
(see point A) of each inside railing corner arc. In a nutshell, you’re
separating the straight lines of the railing from the curves. If you
are working with a completely rounded off end table, you’ll
only have one 90-degree radius point right down the middle of the
table.
- Do the red line cuts
second, again along the 90-degree radius point (see point B) of each
railing corner arc.
- Lastly, make the blue line
cuts extending out towards the railing from the center point of each
corner arc. Note you’ll be estimating these cuts to be perpendicular
to wherever your target (see points C) is on the railing. This is
done so that you can stretch the Naugahyde squarely across the railing
when working on the corners.
A helper will be useful with holding the frame in place as you attach
the inside material to the frame with the staple gun. Don’t skimp
on the staples, and make sure all the staples are tapped down with a
small hammer to ensure they are tightly holding down the material. Start
on ends first, and then finish the straight sides of the table.
The corners will be the most difficult, and should be done last. As
you make your way around each turn, fold the V-shaped material over
the bottom of the padded railing and attach it snugly to the bottom
of the frame with the staple gun. If you ignored the 3” warning
and made your cuts too close to inside edge of the railing, you have
a problem, as it will be seen. Try to keep a consistent stretch when
working the inside of the rail. If you get one section tighter than
another adjacent section, a “wave” or “low spot”
in the padding will appear on the top of the pad. You will have to loosen
it up to take the wave out and re-staple it. Add some additional staples
as you see fit then cut off excess leather and you should end up with
your railing looking like this. |
|
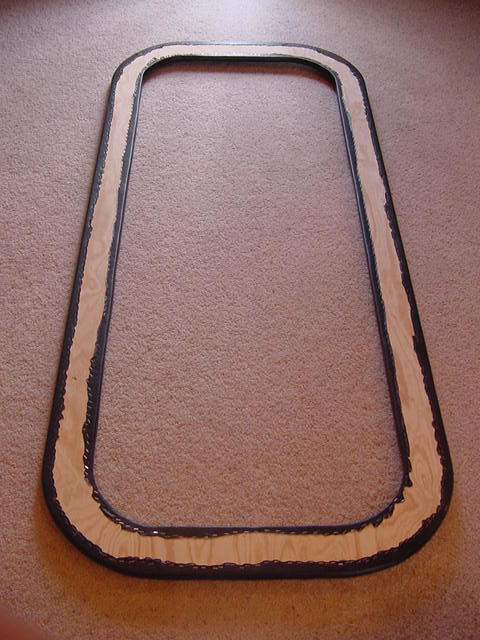
Figure 23: Underside of the padded
railing, stapled and trimmed. |
|
If done correctly, the inside of the riling should have
no visible cuts or wrinkles, which his a lot easier said than done.
<<
Previous page | Next
page >>
|
|
|
| | |